Automated Testing
Automated testing is an important part of industry software engineering development, and is virtually present at all major companies. While in certain companies, this role will be covered by a dedicated QA team, in others, it will be the responsibility of the developers themselves, e.g., at Amazon. Regardless, understanding and being able to write unit tests is important for a SWE to be able to communicate and standby their code.
The automated testing process is part of the wider build/development process and is usually run as part of the CI/CD pipeline. The ultimate goal of automated testing is to ensure that the code functions as expected, and that any changes to the codebase do not break existing functionality.
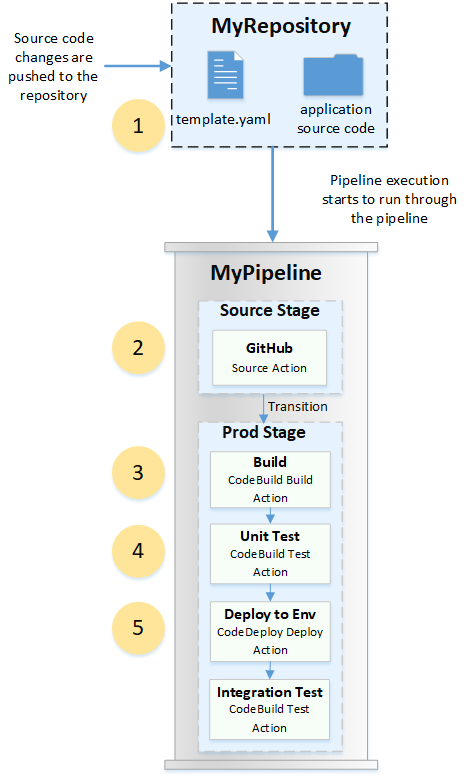
As background, most companies to implement their CI/CD pipeline with their Git implementation (of which are usually internal), and so we will be talking about unit testing and integration testing from the point of you pushing your code to a Git repository. So imagine that all of these tests will be executed from the moment that you push your code to your project repository.
Further, there are usually “pipelines” for each project (e.g., AWS CodePipeline), and each of your code commits “flows” through your project pipeline. Generally, pipelines are usually composed of a series of “stages” that are executed sequentially. For example, after some cloud machine builds your code, the first testing stage might be to run the unit tests, and the second testing stage might be to run the integration tests. These setups vary from project to project, and you may be able to override passing criteria, but testing can lead credence to your implementation, and can support allow your code to promote (pass on to) production.
Unit Testing
Unit tests are meant to test your code commit(s) specifically, rather than dependencies and other modules that may be present in the code base. So unit tests go well with the microservices architecture. The industry will use various frameworks for unit testing, depending on the stack, e.g., language. For example, Python uses unittest, Java uses JUnit or Mockito, and JavaScript/TypeScript uses Jest. A good choice is one that supports mocking, spies, and other features that allow you to avoid testing 3rd party function calls (don’t run them). Instead you should assume some expected behaviour from 3rd party function calls, and write tests that cover every “branch” of your code (code coverage). With that stated, some resources for the most important parts of unit testing are:
- Test Coverage:
- Atlassian: What is Test Coverage?
- Microsoft: Code Coverage
- Unit Test Cases:
- Guru99: Unit Testing Tutorial
- AWS Unit Testing: Getting started with testing serverless applications
- Coursera: How to Write Test Cases: A Step-by-Step QA Guide
- Mocking:
- Mocking in Python: Mocking in Python
- Mocking in Java: Mockito Tutorial
- Mocking in JavaScript: A guide to module mocking with Jest
Integration Testing
Integration testing, in contrast to unit testing, is meant to verify that your code works with other components/modules/services. We want to test that overall the entire system works as expected. They often execute after setting a production-like environment, and integration test frameworks can differ between projects, but while there aren’t really any ubiquitous integration testing specific frameworks, services like CircleCI can help automate the process, and Selenium is a popular tool for testing web applications. Some resources for the most important parts of integration testing approaches are:
- General:
- Big Bang Approach:
- Educative: What is big bang testing?
- Incremental Approach:
- Educative: What is incremental testing?
- Sandwich/Hybrid Approach:
- Educative: What is the hybrid testing approach?
API Testing
Another important area of automated testing is API, or Application Program Interface, testing. API testing can be helpful to integrate into your automated tests as it ensures that the requests that your software sends are correctly received and in turn, you receive the right output. API testing is incredibly powerful and can be used to not only check that the right status is received but also to check that the data returned is of a particular form or has certain attributes, amongst other things. Errors returned in automated API tests can be a sign that there is an error in your code in the requests you send or that there has been a change to the API that you are accessing. Either way, these tests can be a great method of catching these issues early and resolving them before your code is deployed. In larger software systems, there are actually a number of applications of API testing beyond the two mentioned above which can include aspects such as penetration testing or security testing and a more extensive overview of these kinds of tests can be found at https://blog.hubspot.com/website/api-testing.
Testing in Postman
A common tool for testing APIs during the development phase is Postman, which allows you to send a variety of requests such as GET and POST requests and examine status codes and outputs. However, Postman can actually also be used to create automated API tests that can be integrated with your CI/CD pipeline. These automated tests can then be configured to run on certain actions, such as a push to main. In order to understand how to set up this automated testing, we first need to understand how testing works in Postman. To automate your API tests and integrate them into your CI/CD pipeline, Postman requires that your tests be capable of being run through the command line interface, or CLI. This, however, is not the only way that Postman supports testing; rather, there are 3 methods:
- Manually: After setting up your Postman tests, you can run them manually through the application.
- Scheduled: You can schedule your tests to be run at regular intervals from the Postman cloud, as determined by you (e.g. once a day, once a month, etc.).
- Through the CLI: After setting up your tests in Postman, you can run them through a command line interface such as Terminal by generating an API key that lets you log in to Postman from your Terminal and then execute a command to run your collection. This command is provided to you by Postman.
Setting up Automated Testing in Postman
Having understood the 3 methods of testing in Postman, I will now delve into the last one in more detail to allow you to set up automated API testing. In the Postman app, you should navigate to “APIs” in the left sidebar. Then, create a new API by pressing the + sign and give it an informative name. Inside this API you want to create a new request for every endpoint or feature that you want to test. This can be done by right-clicking and selecting “Add request”. Inside the request, add any necessary parameters or headers as you normally would inside Postman. Then, you can click on the “Tests” tab and create your own Postman tests here. To learn more about the syntax for doing so you can use the quick help feature which describes how to write these tests in more detail. To set up automated testing you can then right-click your API and select “Run collection”. In the sidebar that opens on the right, you will now see the 3 options discussed above. Click on “Automate runs via CLI” (although it can be a good idea to run your tests manually once to confirm they work as a sanity check) and then press “Configure command” under the “Run on CI/CD” header. This will open a new page that allows you to select your CI/CD provider and the operating system environment for the pipeline. You can copy and paste the generated commands into your configuration file. Make sure you generate an API key and add it to your repository’s secrets. For reference on how to do this in GitHub, see https://docs.github.com/en/actions/security-guides/using-secrets-in-github-actions. You now have automated API testing set up through the Postman CLI!
Postman Automated Testing Involving Authorization
Note that there are some extra steps that you must take if your API requests require authorization in the form of a bearer token to be properly processed since if you hard-code the token into the request it will eventually expire and cause the automated tests to fail. This can be the case for a lot of APIs but does not mean that you can’t incorporate automated API testing. Instead, what you must do is add a request inside your API collection that gets these authorization details. You can then create an environment by clicking on “Environments” in the left sidebar underneath “APIs”. Create a new environment and define environment variables that will store all the necessary authorization details from your request. You can now navigate back to your API and select the environment you just created from the dropdown on the top right of your screen. Go to the “Tests” tab of the authorization request you added and add a line of code to scrape the authorization token and other details from the request’s output and store it in the environment variables you created. Once again, the Postman quick help contains information on how to write this line of code under “Set an environment variable”. Then, for all the other requests in the API, you can add the relevant authorization details by clicking on the “Authorization” tab and filling out the fields using your environment variables. Lastly, you must ensure that when you create your test collection you re-order the tests by dragging and dropping so that the request that collects authorization details is run first, enabling the rest of your tests to work correctly with renewed authorization details. Using refresh tokens or the form of scraping described above is incredibly beneficial for automated API testing as it ensures that you, as the developer, will not have to manually change the tokens of your requests every time you want to commit to a branch or main and have these automated tests run. Rather, you can rest assured that these tests are truly automated now and do not require any manual changes from you in order to be run.
Approaches to Automated Testing
One approach to automated testing uses Behavioural-Driven Development (BDD).