Node.js Deployment through Docker and AWS
Table of Contents
Overview
Tech Stack
Deployment Process
External Links
Overview
In the realm of modern software development, containerization has become a standard practice for deploying applications. Docker simplifies this process by packaging applications and their dependencies into containers, ensuring consistency across various environments. Node.js, a popular JavaScript runtime, is often used to build scalable and efficient server-side applications.
AWS (Amazon Web Services) provides a suite of cloud services that enable developers to deploy and manage applications easily. ECS (Elastic Container Service) and ECR (Elastic Container Registry) are two fundamental services offered by AWS to manage containers and container images, respectively.
Running your Node.js application on an EC2 instance will allow this to be accessed on a public domain hosted by AWS. Containerizing your Node.js application through Docker allows for easy deployment via running the application in an isolated environment. Combining these together allows your application to run inside a container while inside a virtual machine which is hosted on the cloud.
Here is a rough visualization of what the process of deploying the application will be like:
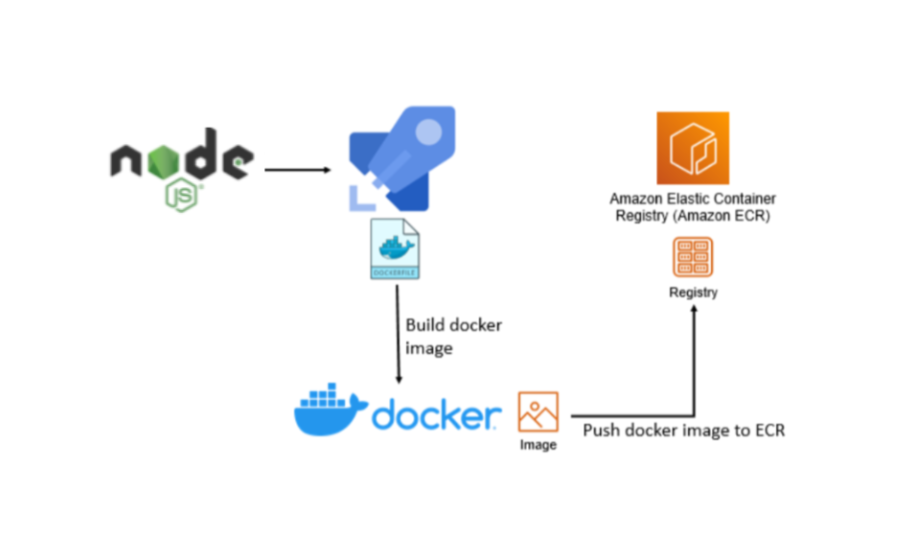
This diagram shows containerizing a Node.js application by building an image of it and pushing it to an Amazon ECR Repository
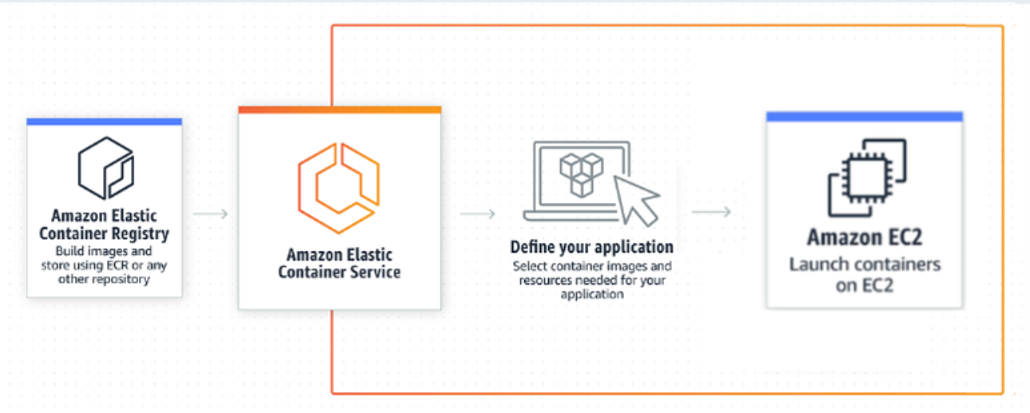
This followup diagram shows how an ECR Repository connects to Amazon ECS and is then deployed to an EC2 instance
Tech Stack
Docker: Docker is a platform that allows you to package an application and its dependencies into a standardized unit called a container. It provides isolation, portability, and scalability for applications. It allows for easy deployment as it essentially creates a separate virtual machine to run the application on.
Node.js: Node.js is a JavaScript runtime environment which is built on Chrome’s V8 JavaScript engine. It enables developers to run JavaScript code on the server-side, making it ideal for building scalable network applications.
Amazon ECS (Elastic Container Service): ECS is a fully-managed container orchestration service provided by AWS. It allows you to run, stop, and manage Docker containers on a cluster of EC2 instances easily.
Amazon ECR (Elastic Container Registry): ECR is a managed Docker container registry provided by AWS. It allows you to store, manage, and deploy Docker container images, making it easy to integrate with ECS for container deployments.
Amazon EC2 (Elastic Compute Cloud): EC2 is AWS’s resizable cloud computing service offering virtual machines (instances) for running applications. It provides flexibility to configure and scale computing resources based on demand.
Deployment Process
This guide assumes you have already created your Node.js application and are using the Bash Unix shell.
Containerize your Node.js application:
Using Dockerfile allows one to create a container for the app.
1) Create a Dockerfile in the root directory of your Node.js application.
2) Write instructions to build your Node.js app within the Dockerfile.
3) Build the Docker image locally using docker build -t
- You can use any port numbers but we will use 8080:80 as the example
- The first number 8080 is the host port and 80 is the container port.
5) If it is running correctly, you can stop and remove the container using this command (Assuming there are no other containers to be kept).
$ docker container prune
Create an ECR repository:
1) Log in to the AWS Management Console. 2) Go to the Amazon ECR service. 3) Create a new repository to store your Docker image. 4) Copy the Image URI 5) Push your Docker image to ECR:
Log in to ECR using the AWS CLI:
$ aws ecr get-login-password --region <region> | docker login --username AWS --password-stdin <aws-account-id>.dkr.ecr.<region>.amazonaws.com
Tag your Docker image with the ECR repository URL:
$ docker tag <image-name> <aws-account-id>.dkr.ecr.<region>.amazonaws.com/<repository-name>:<tag>
Push your Docker image to the ECR repository:
$ docker push <aws-account-id>.dkr.ecr.<region>.amazonaws.com/<repository-name>:<tag>
- Replace <image-name> with the name you want to label your image with your desired name for the image
- Replace <aws-account-id>, <region>, <repository-name>, <tag> with your correct credentials and your ECR name URL.
You can also instead press the “View push commands” button and follow those instructions.
Create an ECS Task Definition:
Go to the Amazon ECS service in the AWS Management Console. 2) Click on “Task Definitions” in the left-hand navigation pane. 3) Click “Create a new task definition” 4) Specify your container image details
- Copy the Image URI from the ECR dashboard
- The container port mapping you established in the previous step
- How much memory it requires (CPU, GPU)
- Click the “Create” button at the bottom
Create an ECS Cluster:
Inside the AWS Management Console of ECS cluster 1) Click create an ECS cluster. 2) Configure the ECS cluster settings and select launch type EC2 3) Select the EC2 instance type
- This is yours to decide how much memory your virtual machine should have. The most common is the t2.micro type which is eligible for the free tier. 4) Click the “Create” button
Create an ECS Service:
Inside the same dashboard click on the ECS cluster you created 1) Click on the “Create service” button 2) Ensure the instance type is EC2 instead of Fargate and that it is a service not a task 3) Under “Select a task family”, select your created task definition in the previous step 4) Define any other desired number of tasks, network configuration, load balancer settings, etc. 5) After finalizing settings, create the service and run the service
Expose the EC2 IP Address to External Connections
Go to the AWS Management Console for EC2 1) Find the EC2 instance linked to your ECS cluster and click on the security group 2) Press edit inbound rules and add a two new rules 3) Set the type to all traffic and all ports from any IPV4 4) For the other rule set it to also accept any traffic from all ports from any IPV6 5) Click save rules
Access your Node.js application
Go to the EC2 Management Console and find the same EC2 instance 1) Find its public IPV4 address or DNS and add a colon with the port number at the end 2) Use your browser to access it or any other service (Postman, Insomnia, etc.) 3) You should see either a Cannot GET message or your expected endpoint result
Note: Set up a test endpoint to confirm that the Node.js application is running
External Links
A more detailed version of my article with more in depth steps is available here if you need more help, posted by Raphael Mansuy:
- https://dev.to/raphaelmansuy/deploy-a-docker-app-to-aws-using-ecs-3i1g
Here are some extra links that will help you incorporate other AWS services with Node.js like an RDS database or a S3 bucket:
Amazon S3:
- https://medium.com/codebase/using-aws-s3-buckets-in-a-nodejs-app-74da2fc547a6
- https://www.jsowl.com/how-to-download-a-file-from-aws-s3-in-javascript-node-js/
Amazon RDS:
- https://medium.com/@Anas.shahwan/how-to-connect-aws-rds-mysql-nodejs-application-in-5-minutes-40d6fbf09b66
- https://stackabuse.com/using-aws-rds-with-node-js-and-express-js/