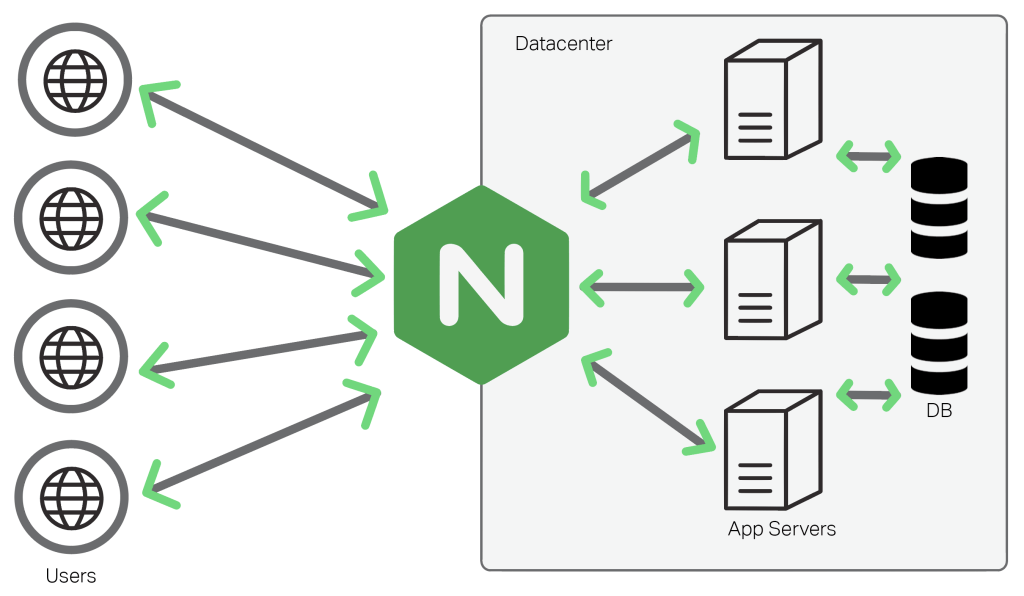
What is Nginx?
Nginx is the internet’s traffic cop. Imagine you search for a website in your browser. Your request is sent accross the internet to that website’s server. When the request reaches the website’s server, it first has to go through Nginx. Nginx then directs your request to the correct place on the website’s server, whether that might be querying a backend server like Django, fetching an image or other static content, or doing some other kind of task on the website’s server. Nginx is really good at rerouting these requests really quickly, so that it can handle lots of requests at a time, keeping things moving quickly for everyone using the website. Nginx is essentially the middleman between the internet and a website.

Nginx can do many things, like:
- Serve web traffic over HTTPS
- Load balance requests between multiple backend servers
- Serve static content without a backend server like Django or Express
You can find a more exhaustive list on the offical Nginx docs
Nginx vs. Apache
Apache is another popular webserver that is often used in place of Nginx. Nginx has several advantages over Apache:
- Due to its asynchronous, event-driven architecture, Nginx tends to have better performance when serving static content and dealing with many concurrent connections
- Nginx’s configuration is easier to set up for reverse-proxying and load balancing than Apache, so it is often preferred as a gateway between your application and the public internet.
There are also advantages to Apache, including:
- Maturity. Apache has been around for a long time and has a large, stable ecosystem of modules available to extend its use-cases.
- Apache also uses
.htaccessfiles for configuration, which some developers argue are simpler than Nginx’s configurations
At the end of the day though, they’re both highly reliable, tried-and-true technologies, so there’s really no wrong choice. That said, developers tend to prefer Nginx nowadays, since it’s more well-known than Apache and has better performance at scale.
Installation and Setup
The installation processes varies depending upon your OS. It’s most common to install Nginx on a Linux server, since this is what most of the cloud runs on. Here, we’ll demonstrate how to install and setup Nginx on a cloud server running on Ubuntu 22.04. In case you want to install Nginx on Mac or Windows, try these tutorials:
We assume that you have the following:
- A cloud server running Ubuntu 22.04 accessible from the public internet
- Digital Ocean is one of the simplest and most user friendly cloud providers. If you need help, checkout this tutorial on how to create a server on Digital Ocean!
- Make sure you can connect to your server over ssh by uploading your ssh key to the server.
- A domain name which points to your server
- You can buy a domain and configure where it points through NameCheap. If you need extra help, you can follow this great YouTube tutorial on how to point a NameCheap domain at a Digital Ocean server.
Connecting to your server
In order to install Nginx on our server, we will first need to be connected to our server. Open a new terminal window and enter ssh root@<your-server-ip>, where <your-server-ip> is the IP address of your server. You should now be connected to your server.
Install Nginx
On your server, run the following commands to refresh your server’s package index and install Nginx onto your server:
sudo apt update
sudo apt install nginx
Now, configure your server’s firewall to allow HTTP traffic via Nginx:
sudo ufw allow 'Nginx HTTP'
You can confirm HTTP traffic is now allowed with:
sudo ufw status
The output should indicate that HTTP traffic is now allowed, like this:
When we installed Nginx with apt, the operating system should have started the Nginx service at the end of the installation process. We can confirm Nginx is running by entering:
systemctl status nginx
If we ever need to restart or stop the Nginx service, we can do so with systemctl restart nginx and systemctl stop nginx.
Now, let’s navigate to our server in the browser, and see what’s there. Go to http://yourdomain.com, where yourdomain.com is the domain name you have pointed at your server. If all goes well, you should see the default Nginx landing page, letting you know that the web server is running!

Next Steps
Now that we have Nginx installed and running on our server, the possibilities are endless. Here’s a few ideas:
- To configure Nginx as a reverse proxy for an application server like Django or Express, try this tutorial from Digital Ocean explaining how to reverse proxy a simple Gunicorn server.
- To serve static content like prebuilt websites or images using Nginx, try this excellent tutorial from the official Nginx website on how to serve static content.
- To secure Nginx with Let’s Encrypt SSL and allow your websites to be accessed over HTTPS, try this tutorial from Digital Ocean on how to set up secure SSL encryption with Nginx.