Understanding Bluetooth in Mobile App Development
Introduction to Bluetooth

Image credit: CC0 Public Domain
Principles for Data Communication
As a wireless technology, Bluetooth is used to exchange data between devices over short distances. Since the fundamental functionality of Bluetooth technology is to enable communication between devices, it is important to understand the principles of data communication.
There are several characteristics of Bluetooth technology that are important to understand:
Delivery
Bluetooth technology is designed to deliver data between devices. This means that data from one device must be delivered to and received by the correct destination device.
Accuracy
Data transmitted over Bluetooth must be accurate. This means that data received by the destination device must be the same as the data sent by the source device, with no alterations or errors. Think of the scenario where your phone tries to play a song over a Bluetooth speaker, but the song is distorted or skips.
Timeliness
Data transmitted over Bluetooth must be delivered in a timely manner. Continuing the example of playing a song over a Bluetooth speaker, the song should play without any noticeable delay or lag. When you press play, the song should start playing immediately.
Jitter
Jitter refers to the variation in the time it takes for data to be delivered. Specifically for audio and video transmission, it is the uneven spacing between data packets. For example, you might have noticed slight cuts in audio or video when using Bluetooth headphones or speakers. This is an example of jitter.
Architecture of Bluetooth Technology
Being a type of Wireless Personal Area Network (WPAN), the architecture of Bluetooth can be defined using two types of networks: piconet and scatternet.
Piconet
A piconet is a minimal network of devices connected using Bluetooth technology. Here, it contains a primary node called the master and one or more secondary nodes called slaves. The communication between the master and the slave can be one-to-one or one-to-many, but it is restricted to only master-slave communication, with no slave-to-slave communication allowed. The master is responsible for the synchronization of the piconet.
Scatternet
A scatternet is a network of piconets interconnected by a bridge device. This bridge node essentially acts as a slave in one piconet and a master in another.
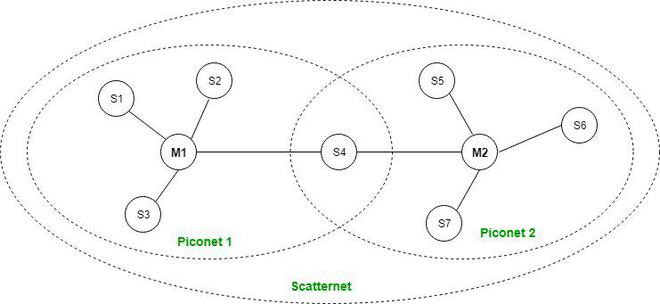
Image credit: raman_257, Geek for Geeks
Applications of Bluetooth in Mobile Use Cases
Bluetooth is a Wireless Personal Area Network (WPAN) technology that is widely used in mobile app development. Due to its feature of short-range communication, we have commonly encountered Bluetooth in various mobile use cases, especially when our phones are used as the source of data. For example, we use Bluetooth to connect our phones to wireless headphones, speakers, and other audio or video devices.
While sending data from our phones to other devices is a common use case, Bluetooth is also used to receive data from other devices, and this typically involves specially designed mobile apps to deal with data transfer. For example, in the healthcare setting, many wearable medical devices use Bluetooth to send data to a mobile app for monitoring and analysis. This method eliminates the need for wired connections and allows for more mobility and flexibility for the device design. However, unlike broadcasting data to a speaker, these type of data transfer are rather lightweight, but require a high level of accuracy and timeliness, as well as a low energy consumption for the advertising device. Therefore, an alternative to the most common Bluetooth technology, Bluetooth Low Energy (BLE), is often used in these cases.
Understanding BLE
Since a common use case in which Bluetooth is used in mobile app development is to send and receive data from other devices, (as in a mobile app is developed to communicate with a wearable device), it is important to understand the principles of Bluetooth Low Energy (BLE).
What is Bluetooth Low Energy (BLE)?
Unlike classic Bluetooth, BLE is a distinct and independent protocol that is designed for low energy consumption. It is optimized for low power devices and is designed to operate for a much longer period of time. However, the low energy consumption comes at the cost of reduced data throughput. In this case, the data is not transmitted continuously, but in small packets at regular intervals. This is known as advertising. The feature of low energy consumption and intermittent data transmission makes BLE suitable for wearable devices, healthcare devices, and other IoT devices where the size and battery life of these devices are important.
A classical application of BLE is the sport/fitness band. Before the era where everyone has a smartwatches, sport bands are the most common wearable devices used to track the user’s physical activities. Not only does it detect the user’s movements, but often the band is equipped with monitors for heart rate, respiratory rate, and blood oxygen level. These data are usually not constantly send to the user’s phone, but are stored in the band and sent to the phone at regular intervals. That is why users often has to manually open the related mobile app and sync the data from the band to the app to see the most recent data. The above scenario is a typical use case of BLE.
Image credit: Mohammad Afaneh, Novel Bits
BLE Architecture
The BLE architecture can be broken down into three main components: the application, the host, and the controller. They are connected in a hierarchical manner and are considered as subsytems of the BLE stack. The following figure illustrates the BLE architecture:
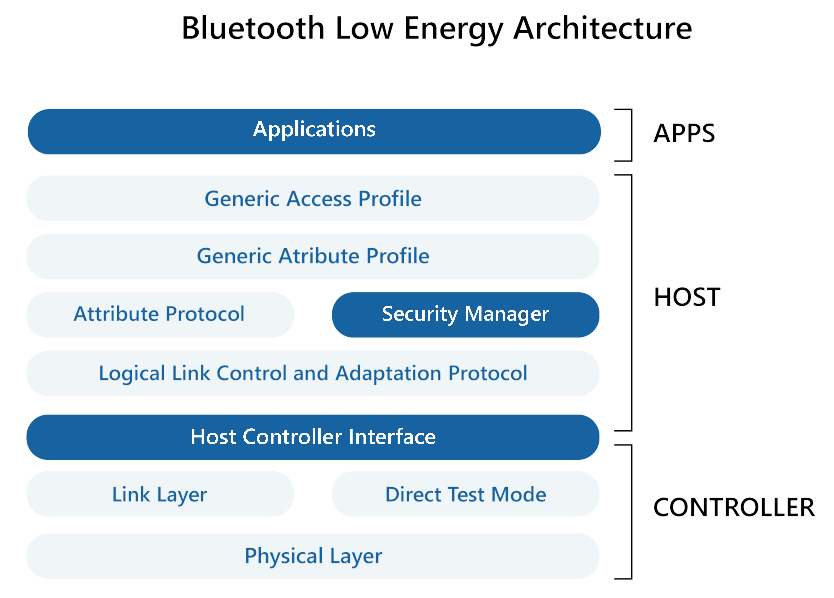
Image credit: WeMakeIoT
Application
The application is the top layer of the BLE architecture and is a user-defined software that bundles the entire BLE functionalities. It is responsible for defining the behavior of the BLE device and managing data exchange and is accessible to the user.
Host
As the middle layer of the BLE architecture, the host is fairly complex and contains multiple sublayers. It modulates the data communication between different aspects of the BLE device.
Controller
The controller is the bottom, physical layer of the BLE architecture. It holds the hardware that hosts the BLE services and is responsible for the actual transmission of data.
Data Communication in BLE
Connection between devices in BLE primarily involves two types of communication: connection-oriented communication and broadcasting-oriented communication.
Connection-Oriented Communication
In this form, a BLE device can behave either as a central or a peripheral device. The primary device is called the “client”, which searches for other devices it can connect to. Once a secondary device is found, the client sends a request to establish a connection. The secondary device is called the “server”, which accepts the request and establishes a connection.
This process involves four steps: advertising, initiating, connection, and exchanging data. As discussed earlier, the data is not transmitted continuously. Instead, advertising is used as the server sends out timed small packets of data in the hope that the client will discover it. Only after the client discovers the server, the client can initiate a connection.
Broadcasting-Oriented Communication
In contrast to connection-oriented communication, broadcasting-oriented communication is not a one-to-one communication. In this case, a connection is not established. Instead, the server broadcasts data to all nearby devices in an undirected manner. However, due to the fact that a connection is not established, data security is a concern in broadcasting-oriented communication.
Developing with BLE in React Native
Since mobile apps are commonly developed to handle connections to BLE devices, it is common that developers use React Native to develop these apps due to the cross-platform nature of React Native. Here, we provide a brief overview of the steps to integrate BLE into a React Native app.
To begin working with a react native app that uses BLE, the first step is to
have npm and react-native installed.
First, install Node.js from the official website.
npm should be installed along with Node.js.
Then, install react-native using the following command:
npm install -g react-native
BLE Libraries for React Native
There are two common libraries associated with BLE in React Native:
react-native-ble-plx and react-native-ble-manager. While both libraries
handles basic BLE functionalities, react-native-ble-plx is more popular and
handles more advanced functionalities such as multi-device connections.
To install the library, use the following command:
npm install react-native-ble-plx
npm install react-native-ble-manager
Steps to Integrate BLE into a React Native App
Step 1: Master BLE Manager
The first step is to create a master BLE manager that handles all the BLE functionalities. This manager is essentially an instance of the BLE library that is used to handle all the BLE functionalities.
import { BleManager } from 'react-native-ble-plx';

const bleManager = new BleManager();
Step 2: Scan for Devices
Before connecting to devices, the app must first scan for devices. This is done
via the startDeviceScan method.
const scanForDevices = () => {
  bleManager.startDeviceScan(null, null, (error, device) => {
    if (error) {
      console.log(error);
      BleManager.stopDeviceScan();
      return;
    }
    console.log(device.name, device.id);
  });
};
Step 3: Connect to Devices
Here, we exploit the connection-oriented communication mode of BLE. Once a
device is found, the app can connect to the device using the connectToDevice
method.
const connectToDevice = (device) => {
  BleManager.stopDeviceScan();
  BleManager.connectToDevice(device.id)
    .then((device) => {
      console.log('Connected to device', device.name);
    })
    .catch((error) => {
      console.log(error);
    });
};
Step 4: Disconnect from Devices
Once the current batch of data exchange is finished, usually the connection is stopped to save energy until the next batch of data exchange.
const disconnectFromDevice = (device) => {
  BleManager.disconnectFromDevice(device.id)
    .then(() => {
      console.log('Disconnected from device', device.name);
    })
    .catch((error) => {
      console.log(error);
    });
};
Common Issues with BLE in React Native
Permissions
To utilize BLE services in a React Native app, the app must request the necessary permissions from the user. Especially on Android, necessary permissions must be granted by the user before the app can scan for devices.
Under app.json, ensure that android-specific settings are given:
{
  "android": {
      "permissions": [
        "BLUETOOTH",
        "BLUETOOTH_ADMIN",
        "BLUETOOTH_SCAN",
        "BLUETOOTH_CONNECT"
      ]
    },
}
At runtime, the app must request the necessary permissions after initializing the BLE manager:
import { PermissionsAndroid } from 'react-native';

const requestPermissions = async () => {
  try {
    const granted = await PermissionsAndroid.requestMultiple([
      PermissionsAndroid.PERMISSIONS.ACCESS_COARSE_LOCATION,
      PermissionsAndroid.PERMISSIONS.ACCESS_FINE_LOCATION,
      const apiLevel = parseInt(Platform.Version.toString(), 10);
      if (apiLevel >= 31) {
        PermissionsAndroid.PERMISSIONS.BLUETOOTH_CONNECT,
        PermissionsAndroid.PERMISSIONS.BLUETOOTH_SCAN
      }
    ]);
    if (granted['android.permission.ACCESS_COARSE_LOCATION'] === 'granted' &&
        granted['android.permission.ACCESS_FINE_LOCATION'] === 'granted') {
      console.log('permissions granted');
    } else {
      console.log('permissions denied');
    }
  } catch (error) {
    console.log(error);
  }
};
Error Scanning for Devices
If the app is unable to scan for devices, it is likely that location services are not enabled on the device. It is necessary for BLE to have access to location services to scan for nearby BLE devices.
Make sure that the users have enabled location services on their devices. This can be done by prompting the user to enable location services if it is not enabled.
import { Linking } from 'react-native';

const promptLocationServices = () => {
  Linking.openSettings();
};
Alternatively, users should turn on location services manually in the settings.