CUDA (Compute Unified Device Architecture)
Table of Contents:
Introduction
Installation
A brief primer to GPU architecture
Writing our first kernel
Optimization techniques
Introduction:
CUDA, short for Compute Unified Device Architecture, is a proprietary toolkit offered for NVIDIA GPUs that takes advantage of the massive amount of parallelism GPUs offer. In today’s landscape, algorithmic complexity and computational theory will only take us so far, and bringing down an algorithm from $O(n^2)$ to $O(n)$ runtime complexity for example will surely help us improve performance, but what if we could assign $n$ units to split up work on our algorithm at a massive scale? Additionally, what if we run into computational problems where there is no good solution? Like the traveling salesman problem? Or gradient descent in machine learning? Or matrix multiplication? Despite our best efforts in reducing these problems computational costs either theoretically or practically through optimization techniques at the CPU level, they are still too costly to perform at a large scale. This is where GPUs come into play. Instead of having one horse pulling a cart, what if you had a thousand chickens? Or ten thousand chickens? Maybe even a million chickens? GPUs are like the million chickens pulling a cart. By having poorer and less versatile performing cores at an individual level than CPUs, we are able to fit thousands, even tens of thousands of cores on a GPU which can compute parallel tasks at a massive scale. The key to doing this is by performing smaller, easy to compute tasks, at a huge parallel scale, compared to tasks that are relatively difficult on their own to compute which would be best fit by a CPU.
Installation:
Note that since CUDA is a proprietary technology, you MUST have an NVIDIA GPU with a valid CUDA compute capability (see here). You can also install this on a machine with an NVIDIA GPU installed, such as a UofT lab machine, or a computer you can SSH into with an NVIDIA GPU.
To install CUDA on your system, simply download the CUDA Toolkit onto your computer. Linux users can either install the executable directly from the NVIDIA website or they can use their favourite package manager to get it from the AUR, APT, and so on. Windows users can simply download the executable directly from the CUDA Toolkit website linked below:
For example, on Ubuntu:
sudo apt update
sudo apt install nvidia-cuda-toolkit
https://developer.nvidia.com/cuda-downloads
Information retrieved from:
https://docs.nvidia.com/cuda/cuda-installation-guide-linux/index.html and https://docs.nvidia.com/cuda/cuda-installation-guide-microsoft-windows/index.html
A brief (oversimplified) primer to GPU architecture:
Let’s assume our GPU is an NVIDIA GTX 1060. A GTX 1060 has 10 streaming multiprocessors, 15 blocks with a total of 1024 threads per block. What does this all mean? Each streaming multiprocessor (SM) contains a certain amount of blocks it can run. A block is an organization of threads, in our case a block contains up to 1024 threads. Threads are run concurrently across blocks, which get scheduled onto SMs. Each SM can handle a certain number of blocks concurrently. In our case, with 10 SMs, if we have 10 blocks, one per SM, each block would be computed in parallel by a separate SM. However, if the number of blocks exceeds 10, let’s say 15 blocks, the SMs would need to context switch between multiple blocks, potentially reducing performance due to switching overhead. Keep in mind that all these performance specifications vary between GPU. Some GPUs support multiple blocks running on an SM without context switching.
This concept is crucial in GPU optimization and is referred to as occupancy – the maximum number of blocks all the SMs on a GPU can handle simultaneously. Maintaining high occupancy is vital for achieving optimal GPU performance in various computing tasks. The concept of occupancy in GPU architecture resembles multithreading on a single-core CPU. In both cases, the goal is to maximize parallelism and throughput by executing multiple tasks concurrently. Just as a single-core CPU executes multiple threads by rapidly switching between them, GPUs with multiple SMs must efficiently manage blocks, ensuring that each SM is fully utilized without excessive context switching.
Another important topic that will come up is GPU memory. Often referred to as device memory (whereas RAM is considered host memory), GPUs have built-in memory to avoid the slow bandwidth encountered with traditional RAM that the CPU communicates with. This GPU memory often referred to as VRAM is high-speed, high-throughput volatile memory that is meant for high-bandwidth operations. When executing GPU code, note that we must transfer elements such as arrays from traditional RAM onto our GPU memory.
The following images below will help clear up any confusion about our GPU architecture.
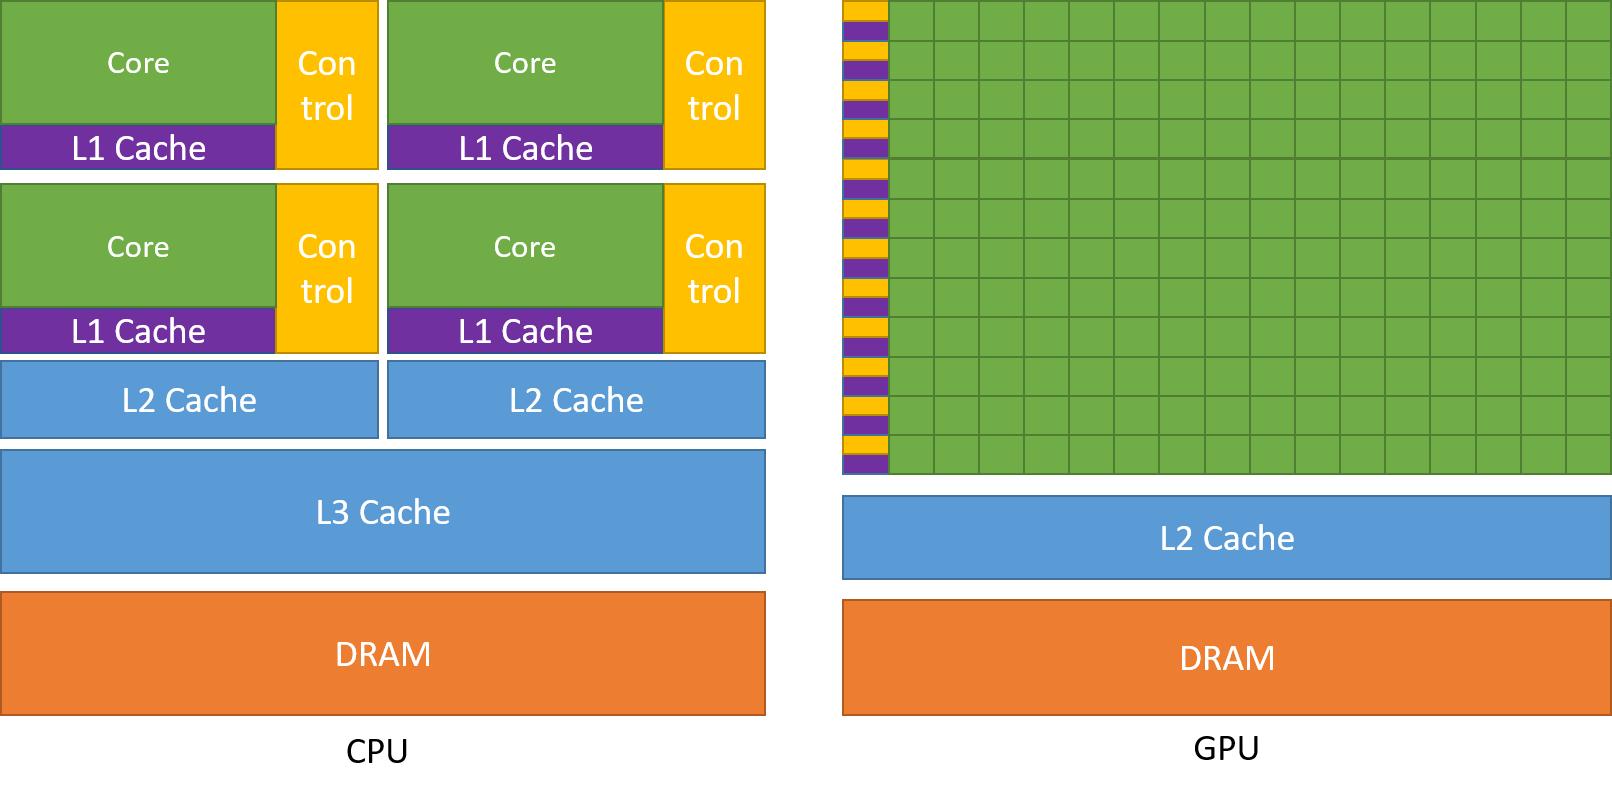 CPU vs GPU architecture. Notice how more cores are devoted to GPUs than CPUs, at the cost of less computational versatility.
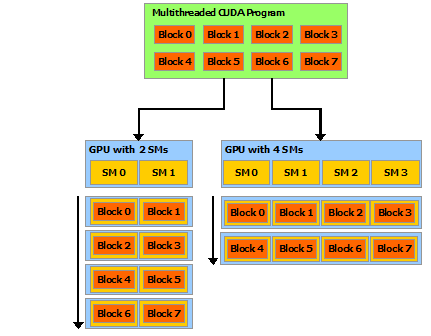 CUDA programs can be divided into blocks which can then be assigned onto SMs by the compiler at runtime.
Source: https://docs.nvidia.com/cuda/cuda-c-programming-guide/
Writing our first kernel:
Note that the CUDA language is effectively a wrapper for C++, with additional runtime libraries provided by NVIDIA. This guide assumes that you are somewhat comfortable with C or C++. Lets start by launching a kernel, which is a specialized function that is executed in parallel by multiple threads on the GPU. In CUDA, this involves defining the kernel with the __global__ qualifier, indicating it’s meant to be run on the GPU. When kernels are launched, they spawn a large number of threads specified in the angular brackets like so, with the block size, and the threads per block being specified like so: <<<blockSize, threadSize>>>example_kernel(param1, param2, ...). Lets define a kernel that multiplies two arrays together and puts the result in another array. But first, we’ll need to allocate some device memory. See the following:
#include <iostream>
__global__ void multiply_floats(float *a, float *b, float *result, int n) {
    int index = threadIdx.x + blockIdx.x * blockDim.x;
    // Get the global thread index by calculating which block and thread inside each block we're in

    // Make sure we don't calculate over the array size
    if (index < n) {
        result[index] = a[index] * b[index];
    }
}

int main() {
    int n = 100000000; // Size of the arrays
    float *a, *b, *result; // Pointers for host (CPU)arrays
    float *d_a, *d_b, *d_result; // Pointers for device (GPU) arrays
    size_t size = n * sizeof(float);

    // Allocate memory on the host
    a = (float*)malloc(size);
    b = (float*)malloc(size);
    result = (float*)malloc(size);

    // Allocate memory on the device
    cudaMalloc(&d_a, size);
    cudaMalloc(&d_b, size);
    cudaMalloc(&d_result, size);

    // Copy data from host to device
    cudaMemcpy(d_a, a, size, cudaMemcpyHostToDevice);
    cudaMemcpy(d_b, b, size, cudaMemcpyHostToDevice);

    // Define kernel launch configuration
    int blockSize = 1024;
    int numBlocks = (n + blockSize - 1) / blockSize;

    // Launch kernel
    multiply_floats<<<numBlocks, blockSize>>>(d_a, d_b, d_result, n);
    cudaDeviceSynchronize(); // Wait for GPU code (kernel) to finish

    // Copy result from device to host
    cudaMemcpy(result, d_result, size, cudaMemcpyDeviceToHost);

    // Free device memory
    cudaFree(d_a);
    cudaFree(d_b);
    cudaFree(d_result);

    // Free host memory
    free(a);
    free(b);
    free(result);

    return 0;
}
This is a basic CUDA kernel for performing parallel computations on the GPU. This code snippet allocates memory on both the host and the GPU for these arrays, and also allocates memory on the GPU for the result array. After copying the data from the host to the GPU, it launches the multiply_floats kernel, specifying the number of blocks and threads per block. The kernel computes the element-wise multiplication of corresponding elements from a and b, storing the result in the result array. Finally, the result is copied back from the GPU to the host, and memory on both the host and the GPU is freed to prevent memory leaks. Lets call this file multiply_floats.cu.
Using NVCC, the NVIDIA CUDA Compiler, which we installed earlier from the CUDA Toolkit, we can compile the CUDA program with ease. To compile the program, we simply invoke nvcc from the command line, specifying the source files as arguments. NVCC automatically detects CUDA code within the source files and compiles them into GPU machine code, while also compiling any C++ code present.
nvcc multiply_floats.cu -o multiply_floats
We can then run ./multiply_floats in our terminal to execute this program.
Optimization techniques:
You may notice that running multiply_floats is a bit slow. Some of the major bottlenecks in CUDA kernel computations are:
- Transferring data from RAM to GPU memory
- Access (read/write) times of GPU memory
Lets speed up our multiply_floats kernel by minimizing the bottleneck of transferring data between RAM and GPU memory, as well as improving our read/write times. We can do the former through a technique called pinning the main memory. To speed up the multiply_floats kernel by minimizing the bottleneck of transferring data between RAM and GPU memory and improving read/write times, we can follow these steps:
- Allocate Pinned Memory: Instead of using regular host memory, allocate pinned memory for the input and output data. Pinned memory ensures faster data transfers between the CPU and GPU.
- Instead of using
cudaMallocwe can use thecudaMallocHostfunction to allocate memory on the host that is pinned. See below:

#include <iostream>

__global__ void multiply_floats(float *a, float *b, float *result, int n) {
    int index = threadIdx.x + blockIdx.x * blockDim.x;
    // Get the global thread index by calculating which block and thread inside each block we're in

    // Make sure we don't calculate over the array size
    if (index < n) {
        result[index] = a[index] * b[index];
    }
}

int main() {
    int n = 100000000; // Size of the arrays
    float *a, *b, *result; // Pointers for host (CPU) arrays
    float *d_a, *d_b, *d_result; // Pointers for device (GPU) arrays
    size_t size = n * sizeof(float);

    // Allocate pinned memory on the host
    cudaMallocHost((void**)&a, size);
    cudaMallocHost((void**)&b, size);
    cudaMallocHost((void**)&result, size);

    // Allocate memory on the device
    cudaMalloc(&d_a, size);
    cudaMalloc(&d_b, size);
    cudaMalloc(&d_result, size);

    // Copy data from host to device
    cudaMemcpy(d_a, a, size, cudaMemcpyHostToDevice);
    cudaMemcpy(d_b, b, size, cudaMemcpyHostToDevice);

    // Define kernel launch configuration
    int blockSize = 1024;
    int numBlocks = (n + blockSize - 1) / blockSize;

    // Launch kernel
    multiply_floats<<<numBlocks, blockSize>>>(d_a, d_b, d_result, n);
    cudaDeviceSynchronize(); // Wait for GPU code (kernel) to finish

    // Copy result from device to host
    cudaMemcpy(result, d_result, size, cudaMemcpyDeviceToHost);

    // Free device memory
    cudaFree(d_a);
    cudaFree(d_b);
    cudaFree(d_result);

    // Free pinned host memory
    cudaFreeHost(a);
    cudaFreeHost(b);
    cudaFreeHost(result);

    return 0;
}
Another trick up our sleeves is using shared memory. Just as how CPUs have L1/L2/L3 caches, SMs on GPUs also have L1 caches. Since fetching from VRAM is slower than using an SM’s L1 cache, we can improve read/write times by manually loading our arrays into the L1 caches on our SMs. See the following below:
#include <iostream>

__global__ void multiply_floats(float *a, float *b, float *result, int n) {
    __shared__ float shared_a[1024];
    __shared__ float shared_b[1024];
    // We need to mark shared memory with the __shared__ qualifier
    // so NVCC can recognize that it needs to be loaded into L1 caches

    int index = threadIdx.x + blockIdx.x * blockDim.x;
    // Get the global thread index by calculating which block and thread inside each block we're in

    // Loop over array in strides of block size
    for (int i = blockIdx.x * blockDim.x; i < n; i += blockDim.x * gridDim.x) {
        // Load data into shared memory
        int shared_index = threadIdx.x; // block-wise thread-index
        if (i + threadIdx.x < n) {
            shared_a[shared_index] = a[i + threadIdx.x];
            shared_b[shared_index] = b[i + threadIdx.x];
        }
        __syncthreads(); // Synchronize threads in the block before computation

        // Compute element-wise multiplication
        int local_index = i + threadIdx.x;
        if (local_index < n) {
            result[local_index] = shared_a[shared_index] * shared_b[shared_index];
        }
        __syncthreads(); // Ensure all threads have finished computation before loading new data
    }
}

int main() {
    int n = 100000000; // Size of the arrays
    float *a, *b, *result; // Pointers for host (CPU) arrays
    float *d_a, *d_b, *d_result; // Pointers for device (GPU) arrays
    size_t size = n * sizeof(float);

    // Allocate pinned memory on the host
    cudaMallocHost((void**)&a, size);
    cudaMallocHost((void**)&b, size);
    cudaMallocHost((void**)&result, size);

    // Allocate memory on the device
    cudaMalloc(&d_a, size);
    cudaMalloc(&d_b, size);
    cudaMalloc(&d_result, size);

    // Copy data from host to device
    cudaMemcpy(d_a, a, size, cudaMemcpyHostToDevice);
    cudaMemcpy(d_b, b, size, cudaMemcpyHostToDevice);

    // Define kernel launch configuration
    int blockSize = 1024;
    int numBlocks = (n + blockSize - 1) / blockSize;

    // Launch kernel
    multiply_floats<<<numBlocks, blockSize>>>(d_a, d_b, d_result, n);
    cudaDeviceSynchronize(); // Wait for GPU code (kernel) to finish

    // Copy result from device to host
    cudaMemcpy(result, d_result, size, cudaMemcpyDeviceToHost);

    // Free device memory
    cudaFree(d_a);
    cudaFree(d_b);
    cudaFree(d_result);

    // Free pinned host memory
    cudaFreeHost(a);
    cudaFreeHost(b);
    cudaFreeHost(result);

    return 0;
}