SocketIO
Table of contents
Introduction
Use Cases
Tutorial
Client
Server
Diagram of Messaging app
Resources
Introduction
Socket.IO is a library that enables low-latency, bidirectional and event-based communication between a client and a server. It utilizes one or a combination of the best available low-level transports among the following to provide such a service.
- HTTP long-polling
- WebSocket
- WebTransport
Use Cases
SocketIO is most commonly used to create real time web based applications with low latency and instant refresh. Examples of common use cases include
- Chat/Messaging software
- Multiplayer games
- Collaborative document editors
SocketIO is implemented in both the client and server side. Both client and server have a wide range of related libraries to connect to the language or tech stack being utilized.
In this tutorial, we will explore in detail how to incorporate SocketIO with a Javascript - React.js client and Python - Flask server to give it real time capabilities.
Other implementations can be found on the SocketIO website:
https://socket.io
Tutorial
Client (Javascript-React)
SocketIO can be installed with npm using
npm install socket.io-client
Then, it must be called in the client. This can be done in a number of ways. For instance, in React.js, an easy way to get started if the server is in the same domain as the client is:
import { io } from "socket.io-client"
const socket = io()
There are other ways to initialize socketIO. For instance, in CommonJS:
const { io } = require("socket.io-client");
Or, when the server is in a different domain as client
const socket = io("https://server-domain.com");
More info about initialization can be fount on https://socket.io/docs/v4/client-initialization/
You should initialize based on your unique client settings.
Then, <socket> can be passed as a prop through subcomponents.
import Subcomponent from "./Subcomponent"
function ReactComponent(props) {
     return (
        <div>
            <Subcomponent socket={props.socket}/>
        </div>
     )
}
Using SocketIO in Client
When using SocketIO, you first connect the client and server, then you can transmit signals between them.
To confirm that the client and server are connected, you can run
socket.on("connect", () => {
  console.log(socket.connected); // true
});
Similarly, to disconnect:
socket.on("disconnect", () => {
  console.log(socket.connected); // false
});
After connecting, you can begin using SocketIO.
Sending Signals
Typically, socketIO has 2 states. It is either listening for signals or it is sending signals.
Sending a signal is done through socket.emit("event-a"), while listening for signals is done through socket.on("event-b").
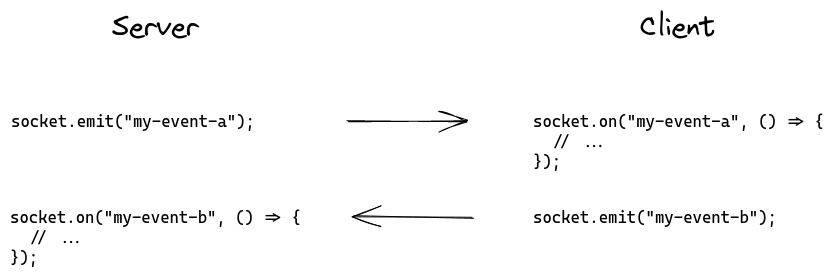
Image from https://socket.io/docs/v4/client-socket-instance/
The command
socket.on(`namespace`)
can be envoked in React.js in UseEffect if it is only turned on once, which should usually be the case since SocketIO does not turn off and is always listening.
The socket.on(`namespace`) command listens for all calls of namespace in the server. When the backend implementation of SocketIO calls namespace, the client socket is alerted, and any server response or data is sent to this endpoint.
Then, in a React component, you might have something like
useEffect(() => {
    props.socket.on(`stateChanges`, (data) => {
            setState(data)
        })
}, [])
For instance, perhaps you might want your messaging app to update whenever anyone in the group chat sends a message. Then, you would want to recieve a message whenever the server sends a signal. So, you could have something like
const [messages, setMessages] = useState([])
useEffect(() => {
    props.socket.on(`newMessage/${room_id}`, (data) => {
            setMessages(data.messages)
        })
}, [])
Similarly, to send a message, you could link the socket.emit("event") to a button press. For instance,
const [currentMessage, setCurrentMessage] = useState("")

send_message_handler() {
        props.socket.emit(`send_message`, {content: currentMessage})
    }

return (
    <div>
        <button> className="sendButton" onClick={() => {send_message_handler()}}
        </button>
    </div>
)
Server (Python-Flask)
You can install socketIO for Flask with pip
pip install flask-socketio
Then, to initialize, you want to initialize SocketIO on top of the typical Flask app:
from flask import Flask
from flask_socketio import SocketIO

app = Flask(__name__)
socketio = SocketIO(app)

if __name__ == '__main__':
    socketio.run(app)
Notably, in __main__ you would run socketio.run(app) instead of app.run().
Then, you can import the socketIO from __main__ to any files you need to use it.
from __main__ import socketIo
Using SocketIO in Server
Then, using socketIO is relatively straightforward on the client side. In Flask, socketIO is very similar to declaring a typical RESTAPI.
To make the socket listen for a signal, put a decorator above a function
@socketIo.on('my-event-a')
def my_function():
    pass
Then, when client side calls socket.emit('my-event-a'), my_function will be called in the server.
The server can also call socketIo.emit('my-event-b') at any time. This can be within my_function or outside of it. The decorator is not needed to call socketIo.emit()
For instance, perhaps you want to send a message without recieving a signal. Then you can define as such:
def some_function():
    socketo.emit('my-event-b', {'text': 22})
Or, you can combine the listening and emitting.
To link back to our example with messaging app, perhaps you would want server to be notified whenever someone in the group chat sends a message.
Then, server might be written like this:
from flask_socketio import emit

@socketIo.on('send_message')
def server_new_message(data):
    message_content = data["content"]
    save_message_to_db(message_content)
    all_messages = get_all_messages(room_id)
    emit(f"newMessage/{room_id}", {"all_messages": all_messages})
You may notice that while socketIo.on() uses the import from __main__, the emit() function does not. This is because emit by default uses the namespace of the recieved message. If none is specified, such as in some_function() specified above, then socketIo.emit() must be called.
The request body sent from the client side is recieved as the data parameter on the server side. It will be treated like a dictionary in Python-Flask, thus all content will be queried with dictionary indexing. Similarly, a response body will be sent as a dictionary but interpreted as JSON in the client side. Both request and response bodies are sent as the second parameter of emit().
The server can also send signals with socketIo.send() instead of emit()
from flask_socketio import send

@socketIo.on('message')
def handle_message(message):
    send(message)
As you can see, send does not require a namespace to be specified. By default, it will use the namespace of the incoming message.
Broadcasting
Another useful way to use socketIO is with broadcasting.
@socketio.on('my event')
def handle_my_custom_event(data):
    emit('my response', data, broadcast=True)
When broadcasting is on, all clients connected to the namespace will recieve the signal, including the sender. This can be convienient when sending messages to multiple clients.
There are of course many more applications of SocketIO in Flask. More details can be found on the Flask-SocketIO website:
https://flask-socketio.readthedocs.io/en/latest/intro.html
Diagram of the Messaging App
Here is a visual representation of the messaging app we have built using SocketIO:
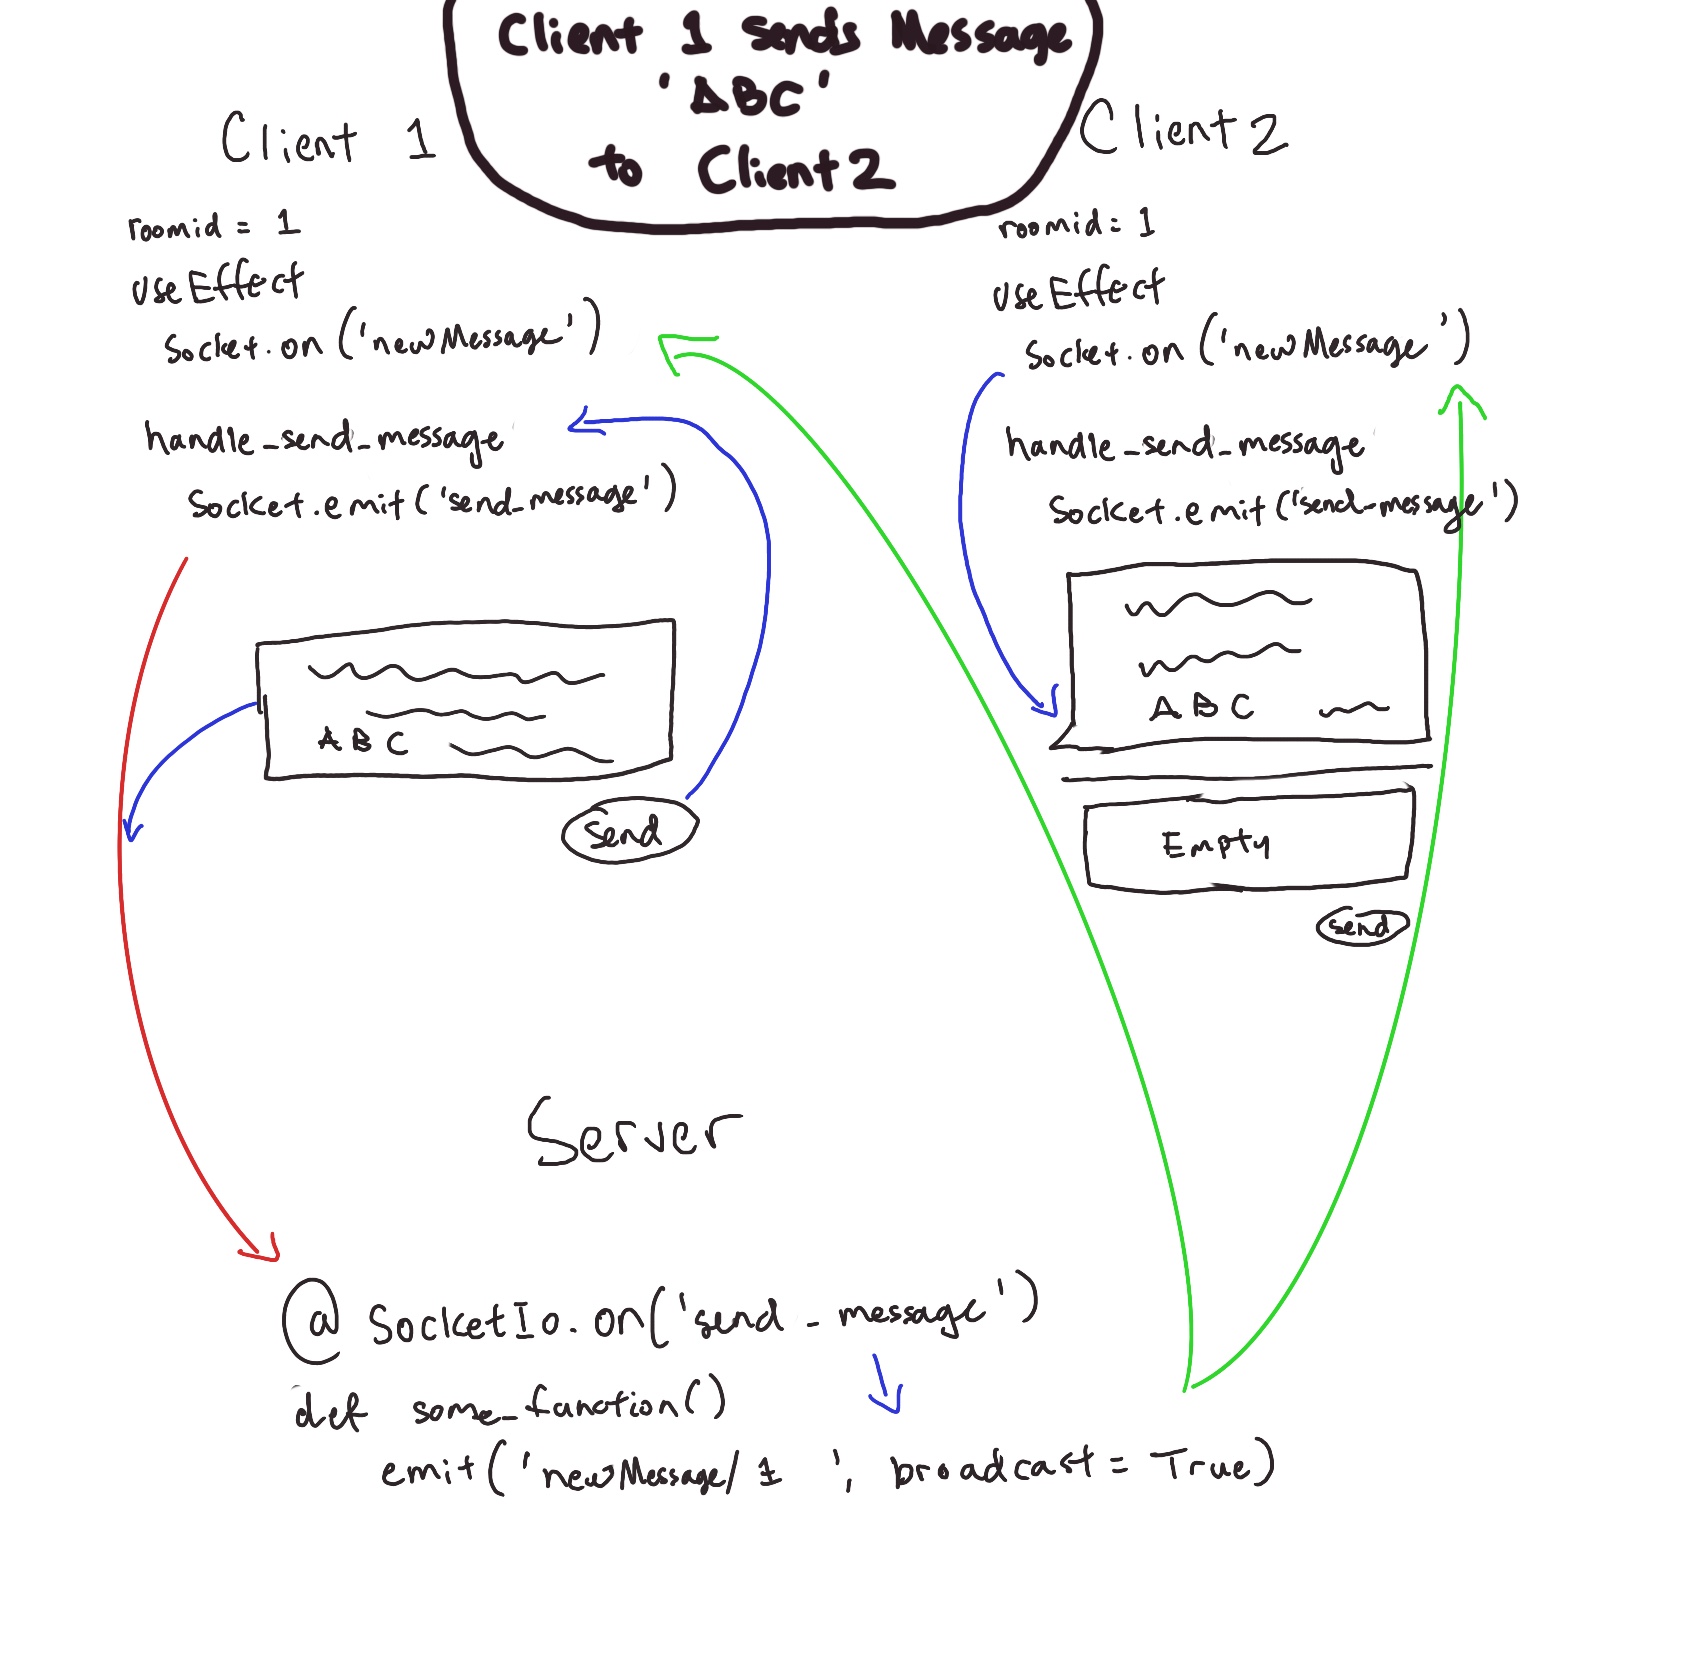
As you can see, when the message is sent through a button click, it passes through the listening server and then is emitted back to all the clients in the same chat room by broadcast, where it updates as a new message.
Resources
https://socket.io
This is the official website of socketIO, it has all the documentation and installation guide for socketIO and all its variants.
https://flask-socketio.readthedocs.io/en/latest/intro.html
This is the website for flask-socketio, a variation of the server side of socketIO that is well integrated with python and Flask. It has the documentation and installation guides.