Learning TypeScript
Table of contents
Introduction
Why use TypeScript
How to use TypeScript
Additional Resources
Introduction
TypeScript is a programming language that extends JavaScript’s capabilities by including optional static type checking and other features. TypeScript is a superset of JavaScript. In other words, TypeScript adds new features on top of the existing JavaScript language, such as optional static typing, classes, interfaces, and more, while still maintaining compatibility with the existing JavaScript ecosystem.
If you aren’t that familiar with JavaScript, you can learn about JavaScript and TypeScript and their relationship here.
If you are already familiar with JavaScript, you can learn more about TypeScript and see some examples here.
To play around with and experiment using TypeScript, feel free to visit the playground page.
Why use TypeScript
TypeScript allows developers to catch potential errors early in the development process (at compile-time instead of runtime) and write more maintainable and scalable code. This can greatly reduce the likelihood of bugs and make code more reliable and easier to maintain, as well as improve code readability and make it easier to write reusable code. This makes TypeScript the preferred choice when building large-scale applications, especially in web development. Its syntax is similar to JavaScript, making it easy to learn and adopt for developers familiar with JavaScript. Additionally, popular code editors such as VSCode offer additional quality-of-life functionalities such as autocompletion when writing in TypeScript, making it easier and faster to write code.
As an example to demonstrate how TypeScript makes life easier, consider the situation where a company imports code from a third party. With JavaScript, since the IDE cannot validate JavaScript references directly, it requires a lot of care and manual testing to modify the imported code. However, with TypeScript, this issue is resolved because the IDE can automatically identify any errors that arise from incorrect references. Here is a more comprehensive guide on the differences between the two, and why TypeScript is more powerful and convenient.
To learn more about why you should consider using TypeScript over JavaScript, visit this blog here.
How to use TypeScript
Installing Node and npm
Before you set up your web development project with TypeScript, you want to first install Node.js if you have not done so already. To install node, simply follow the steps below.
- Check if you already have Node and npm installed on your machine by opening up a terminal window, and running the command
node -vandnpm -v. - Use a Node Version Manager to install Node.js and npm. If you’re using MacOS or Linux, use nvm. If you’re on Windows, use nodlist.
- To use nvm for installation, visit the official nvm github page for a complete guide.
- To use nodist for installation, visit the official nodist github page for a complete guide.
Using TypeScript with common frameworks
You can integrate TypeScript into any JavaScript code, but it is most commonly used for web development using JavaScript frameworks such as React and Angular.
Here is how to create projects with the above frameworks using TypeScript.
React
You can find the complete guide here. To learn more about React and TypeScript, you can also follow this YouTube video by Ben Awad.
To create a React project with TypeScript enabled, follow these basic steps:
- Make sure you have Node.js installed on your machine. If you don’t have Node.js installed, you can visit the official Node.js page here and follow the installation steps.
- Open a terminal and navigate to the directory where you want to create your app.
-
Run the following command to create a new React app with TypeScript:
npx create-react-app my-app --template typescript
That’s it! Now you can use TypeScript files in your React project!
Angular
Angular comes with TypeScript enabled by default. In fact, Angular is built entirely in TypeScript, and is the recommended language for developing Angular applications. This is a summary of the guide found here. To learn more about Angular and TypeScript, you can watch this in-depth YouTube course by Mosh.
-
Make sure you have Node.js installed on your machine. If you don’t have Node.js installed, you can visit the official Node.js page here and follow the installation steps.
-
Open a terminal and install the Angular CLI by using the following command
npm install -g @angular/cli - Open a terminal and navigate to the directory where you want to create your app.
-
Run the following command to create a new workspace and initial starter app:
ng new my-app’
Vue
To use TypeScript in your Vue 3 project using create-vue, which is the official Vue project scaffolding tool, follow the steps below:
-
Open a terminal window, navigate to the location where the project will be created.
-
Run the command
npm create vue@latestto initiate the project creation. (Note: if you do not have Node.js installed on your machine, follow the guide in the sections above to install it first before creating the Vue project) -
Follow the command line prompts to select the preferences for your project. Select
yesfor the promptAdd TypeScript?, and manage other settings to your preference.
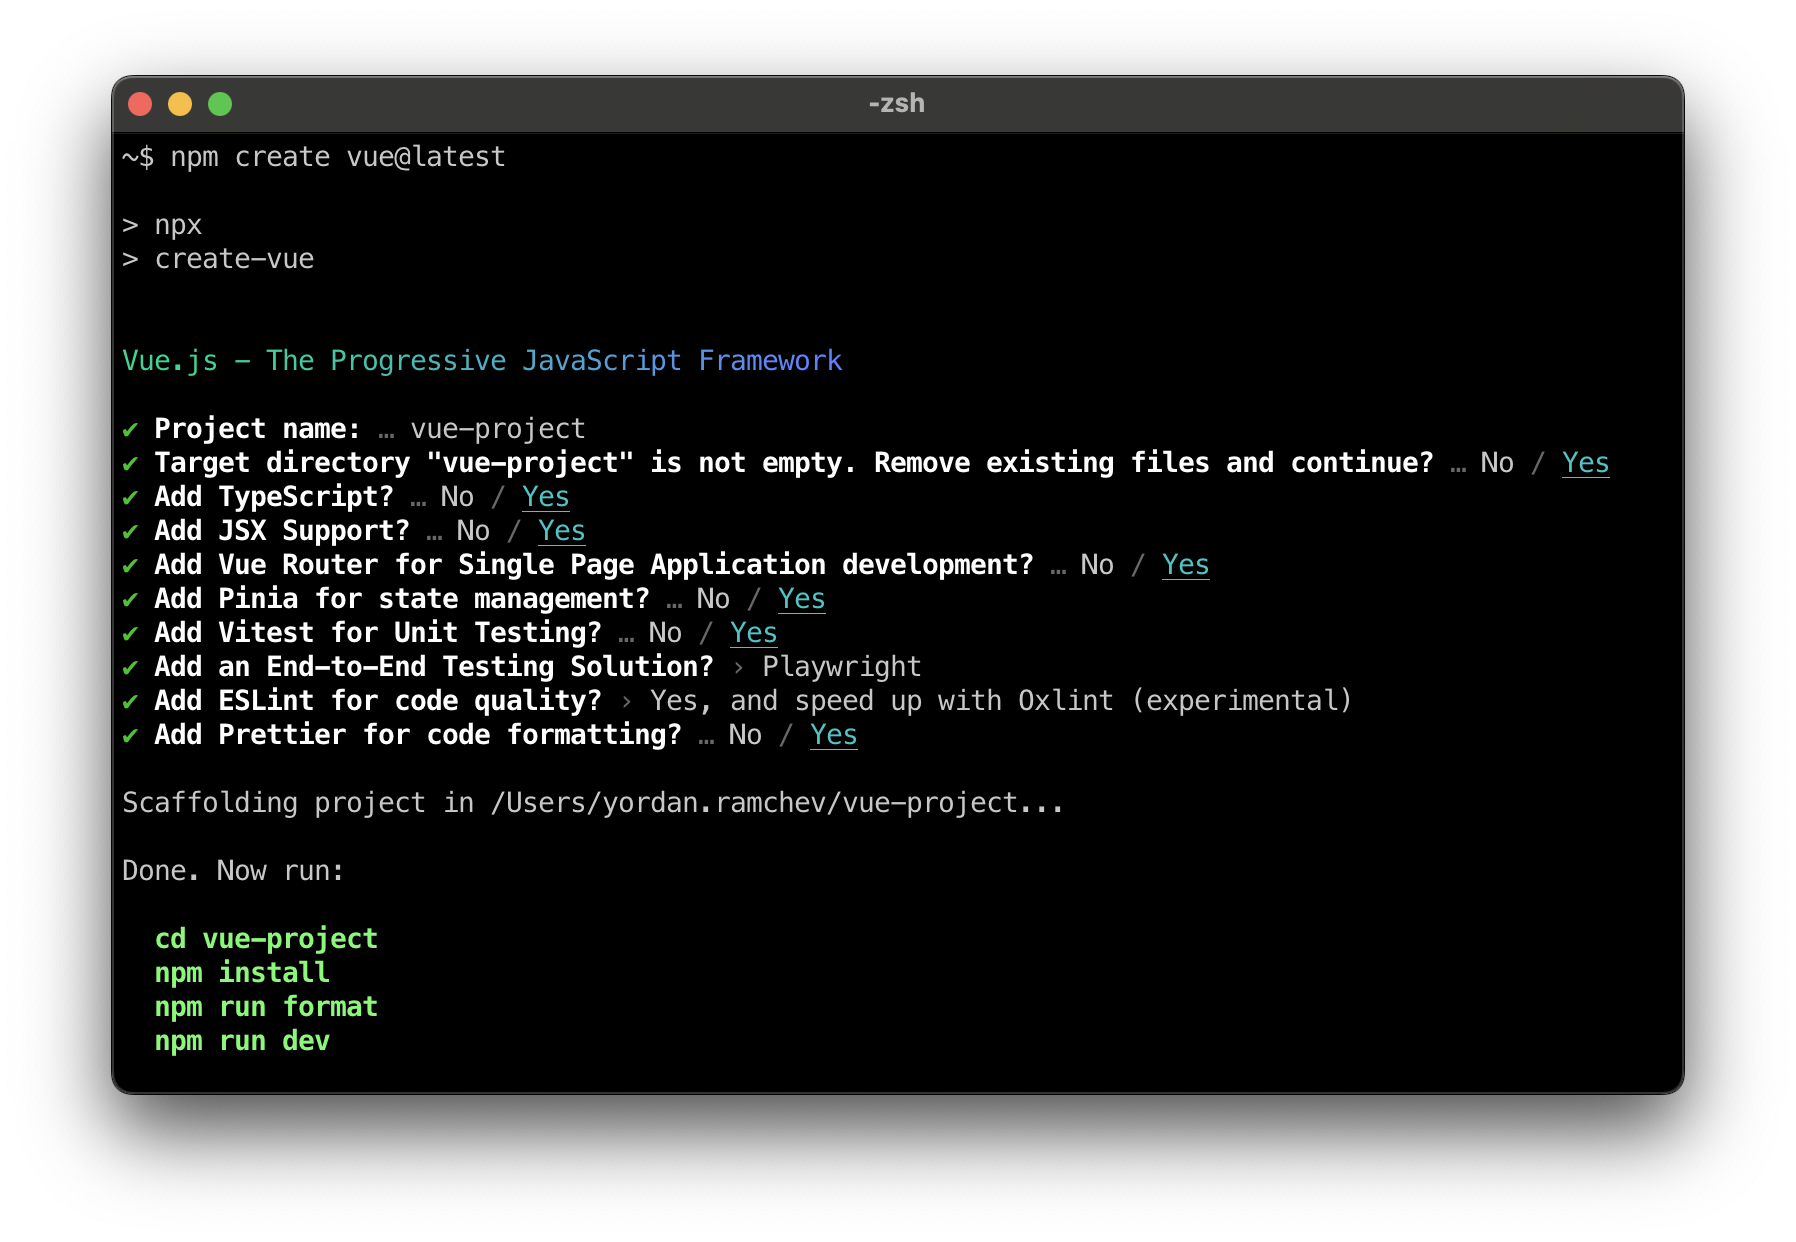
- Done! The Vue project is succesfully created.
It is worth noting that this method is the preferred way to create Vue projects, instead of using Vue CLI, since create-vue is based on Vite. For more information, visit the create-vue Github repository here.
However, if you wish to set up your Vue project with Vue CLI, you can do so by following the instructions in this video.
For a more detailed overview of using TypeScript with Vue, visit the official Vue.js guide page.
Additional Resources
- If you are interested, you can take a look at this free course by codecademy on TypeScript.
- This guide by freecodecamp is another great resource for learning how to use TypeScript.
- To learn more about TypeScript features in depth, you can watch this YouTube playlist by The Net Ninja