Building Apple Native Software Using Swift and SwiftUI
Table of contents
Introduction
Why Use Swift?
What is SwiftUI?
Starting a Swift Project
Swift View
Design Patterns with SwiftUI
Testing Your App - Unit Tests
Testing Your App - Simulators
Testing Your App - Debugging
Other Useful Resources
Introduction
Swift is a modern, open-source programming language developed by Apple as a replacement for their earlier language, Objective-C.
It can be used on Mac devices to develop software that targets all Apple platforms: iOS, macOS, watchOS, and tvOS, while being deeply integrated into Apple’s IDE: Xcode.
In the following official Apple documentation, there are many other resources, such as videos, interactive demos, and guided exercises, you can use to better understand and practice these tools.
Swift Getting Started Documentation
Why Use Swift?
While languages such as React Native allow you to build multi-platform apps, such as for iOS and Android, using only one source code, Swift offers many tools that make it easy to quickly build apps that work specifically throughout all of Apple’s ecosystem of platforms.
Apps built through Swift can intuitively support iPhone and iPad screens at the same time, utilizing design patterns and themes that fit Apple’s design policy to match the expected user experience on an iOS device.
You will have access to an assortment of developer kits that make it simpler to integrate various, native features into your app. For example, WidgetKit can help set up widgets for iOS Home Screens for your app, or HealthKit can allow you to communicate to a user’s health and fitness data, with their permission.
It comes built-in with over 4000 customizable icons and symbols that are designed to seamlessly match Apple software, which you can view and modify through SF Symbols 4.
These are just some of the many advantages available.
What is SwiftUI?
In 2019, Apple introduced a new framework for building user interfaces called SwiftUI. This is a declarative UI toolkit, similar to React, where we can tell it what components we want and the framework will handle performing the steps needed to get that result.
Hacking with Swift is a great free resource for learning how to do specific things in Swift and SwiftUI when the issues arise.
Stanford CS193p is also a great resource for learning app development in SwiftUI for those who prefer a structured course with interactive assignments.
Starting a Swift Project
After launching Xcode, selecting Create a new Xcode project, and choosing which platform and type of app you want to make, you will then have
to fill in the following info:

This information can be changed later, so for starters, you can leave Team to be empty, as this is only necessary for deploying the app to the App Store. Organization identifier is used to uniquely identify your app once it is up on the App Store, so you can choose whichever name you’d like, such as your name or group’s name. Do note Organization identifier cannot be changed once the app is uploaded to the App Store but it is purely metadata.
Make sure to use SwiftUI and Swift as your interface and language respectively, then click Next to choose where to store your project, and now you’re ready to start.
Swift View
A view is a user interface component used to create the visual part of the application. Creating a new project automatically creates a view called Content View:
Views in Swift are defined as structs and must conform to the View protocol. The content and behavior of the view are provided in the body of the view. To see how the view is transformed into the user’s interface and how users can interact with the view, we can either build and run our application on a simulated device or view the Xcode preview. An Xcode preview of a view is created automatically when we create a new view. The Xcode preview will display the Content View as shown below:
To see the view on a simulated device refer to the Testing Your App - Simulators for instrustion on how to set up a simulator. We cannot edit a view through the simulator. We must edit the view manually and rebuild and rerun our application to see the changes reflected on the simulator.
Editing a View
We can edit a view in two ways: manually or through the view inspector (only when the view is opened in Xcode preview). Modifications to the view’s body will be reflected in real-time in the preview. For our example, we will show how to edit the text colour manually and through a view inspector. To edit a view through an inspector:
- Change from
live mode(default mode) toselectable modeto enable editing
Command-control-clickthe element you want to edit, bringing up the structured editing pop-up. The pop-up shows the different attributes you can customize. For our example, we will customize the colour attribute. SelectShow SwiftUI Inspector.
- Select the
color attributeand choose the colorpurple.
The change will be reflected immediately on the simulated device, and Xcode will update your code to match the change.
To edit manually, we must add the line foregroundColor (Color.purple) to the view’s body ourselves.
Combining Views
A single view with multiple elements can lead to a cluttered view body. We should separate each of these elements into their own separate view. Then, combine these views in stacks, which group views together horizontally (HStack), vertically (VStack), or back-to-front (ZStack). For instance, in this scenario, the Circle Image and Map View are initially separate views and are combined in a VStackand embedded with the Content View for display:
Previewing Light and Dark Modes, Orientations, and Device Types
We can see how our user interface will look in light and dark modes. To do so select the Variant Control
and choose Colour Scheme Variants.
We can also view how the user interface will look in different orientations by selecting the “Orientation Variant.”
To view the preview on different device types, you can change the device the preview is displayed on from the buttons below. Here is an example of the same view shown on an iPad:
Design Patterns with SwiftUI
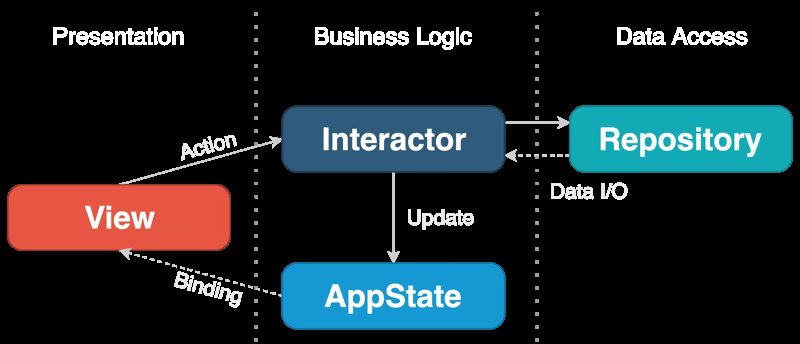
Now that you have seen how to compose a view in SwiftUI, this section will go over how to apply some of the principles of clean architecture to your project. Simply put, there are three main abstraction layers; presentation, business (or domain), and data.
Before going over how to conform your project to this architecture, let’s get familiar with the most common wrappers and protocols (the Swift equivalent of an interface) used in SwiftUI.
State
The State wrapper is a concept similar to react native. It allows a view to own a property and is completely managed by SwiftUI’s property storage. When a value wrapped in State changes, the view is re-rendered to reflect them. State properties can be shared with subviews through a Binding.
Binding
The Binding wrapper creates a connection between a property that stores data and a view that displays and changes the data. It connects the property to some source of truth that is defined elsewhere. Typically the Binding wrapper is used in conjunction with the State wrapper defined above. Changing the value of a Binding creates a waterfall and all views connected to the State property are re-rendered. Here is an example of both in use:
struct PlayerView: View {
    @State private var isPlaying: Bool = false // Create the state here now.

    var body: some View {
        VStack {
            PlayButton(isPlaying: $isPlaying) // Pass a binding.
            ...
        }
    }
}
struct PlayButton: View {
    @Binding var isPlaying: Bool // Play button now receives a binding.

    var body: some View {
        Button(isPlaying ? "Pause" : "Play") {
            isPlaying.toggle()
        }
    }
}
In this example the parent view PlayerView keeps a state variable isPlaying and passes it down the PlayButton view. Notice the $ before referencing the variable, which allows us to reach the property wrapped in a Binding. In this subview, we use the binding to isPlaying to toggle its value on a button press. This causes both the views to re-render because the binding changes the value at the source of truth.
Published
Class attributes can be wrapped with Published, which allows other variables to subscribe to their changes.
ObservableObject
A class that conforms to this protocol can be used to refresh views when their Published attributes change.
ObservedObject
When passing an instance of a class that conforms to the ObservableObject protocol inside a child view, we use theObservedObject wrapper. The behaviour of this object is similar to the Binding wrapper defined above.
StateObject
When instantiating an object of a class that conforms to the ObservableObject protocol inside a parent view, we use the StateObject wrapper. The behaviour of this object is similar to the State wrapper defined above. Here is an example of a class and their views in use:
class UserProgress: ObservableObject { // Define class and protocol
    @Published var score = 0 // Published attribute
}

struct ContentView: View {
    @StateObject var progress = UserProgress() // Source of truth

    var body: some View {
        VStack {
            Text("Your score is \(progress.score)")
            InnerView(progress: progress)
        }
    }
}

struct InnerView: View {
    @ObservedObject var progress: UserProgress // Binding from parent

    var body: some View {
        Button("Increase Score") {
            progress.score += 1 // Updating this refreshes views
        }
    }
}
In this example we have a UserProgress class with a published score attribute. An instance of UserProgress is instantiated in the parent view ContentView and its binding is passed to InnerView. When the button is pressed in the InnerView, the published attribute score changes, which tells SwiftUI to re-render the views that reference this instance of the observable object, thus the score is refreshed on every button tap.
EnvironmentObject
You may have noticed that using StateObject and ObservedObject requires us to explicitly pass the object from the parent view to the child view. If we have many child views or a deeply nested view hierarchy it may be cumbersome to keep passing this object down because not all views may require this specific object. To clean things up, we can wrap the ObservedObject in an EnvironmentObject instead and pass the StateObject in the view environment. This allows us to retrieve the ObservableObject from the parent view’s Environment instead of the parameters of a view. SwiftUI automatically assigns environment objects based on type. We can use this concept to improve the previous example:
class UserProgress: ObservableObject {
    @Published var score = 0
}

struct ContentView: View {
    @StateObject var progress = UserProgress()

    var body: some View {
        VStack {
            Text("Your score is \(progress.score)")
            InnerView() // No longer pass progress to the child view
        }
        .environmentObject(progress) // Pass it through the environment instead
    }
}

struct InnerView: View {
    // Grab UserProgress instance from the view environment
    @EnvironmentObject var progress: UserProgress

    var body: some View {
        Button("Increase Score") {
            progress.score += 1
        }
    }
}
@Environment
We can also add an ObservableObject to a managed Environment instead, which allows us to retrieve custom values as well as predefined Swift values through keys. We can alternatively use this concept on the previous example as well:
class UserProgress: ObservableObject {
    @Published var score = 0
}

struct ContentView: View {
    @StateObject var progress = UserProgress()

    var body: some View {
        VStack {
            Text("Your score is \(progress.score)")
            InnerView() // No longer pass progress to the child view
                .environment(\.progress, progress) // Pass key-value pair
        }
    }
}

struct InnerView: View {
    // Grab UserProgress instance from the environment
    @Environment(\.progress) var progress: UserProgress

    var body: some View {
        Button("Increase Score") {
            progress.score += 1
        }
    }
}
Let’s move on to using these features to implement the structure of an application that uses clean architecture. As an example let’s imagine we are creating an app that keeps track of your startups daily scrum meetings. We can imagine that the data for the daily meetings needs to be stored on a database somewhere, that an interface is required to view this data and we may need to interact with this data as well.
The main structure of the app will look like the following: